//これで呼び出せる!!
ServiceReference1.Service1Client px = new ServiceReference1.Service1Client();
this.Text = px.GetData(987);
DataSet ds = px.GetDataB(new ServiceReference1.OdbcParameter());
[サービス内にGetData関数とGetDataB関数を作成]
[OperationContract]
string GetData(int value);
[OperationContract]
DataSet.SpringJoeDataSet GetDataB(System.Data.Odbc.OdbcParameter prm);
public DataSet.SpringJoeDataSet GetDataB(System.Data.Odbc.OdbcParameter prm)
{
//アダプタは拡張しておきます(partial)
WcfService.DataSet.SpringJoeDataSetTableAdapters.SCV_HACCHU_KTableAdapter adpt = new WcfService.DataSet.SpringJoeDataSetTableAdapters.SCV_HACCHU_KTableAdapter();
WcfService.DataSet.SpringJoeDataSet dtset = new WcfService.DataSet.SpringJoeDataSet();
adpt.GetMyData(dtset, prm);
return dtset;
}
public string GetData(int value)
{
return string.Format("You entered: {0}", value);
}
2011年8月13日土曜日
DataAdapterを拡張したい
DataAdapterを拡張する場合は、
DataSet内に自動生成されるAdapterをpartialで拡張します。
オリジナルのnamespaceにして、
クラス名も必ず同じにします。
namespace WcfService.DataSet.SpringJoeDataSetTableAdapters
{
public partial class SCV_HACCHU_KTableAdapter
{
public SpringJoeDataSet GetMyData(SpringJoeDataSet dtset, System.Data.Odbc.OdbcParameter prm)
{
dtset.Clear();
this.Connection.Open();
this.Adapter.SelectCommand = new System.Data.Odbc.OdbcCommand();
this.Adapter.SelectCommand.Connection = this.Connection;
this.Adapter.SelectCommand.CommandText = strSQL;
prm = new System.Data.Odbc.OdbcParameter(":A_ID", "9");
this.Adapter.SelectCommand.Parameters.Add(prm);
this.Adapter.Fill(dtset);
return dtset;
}
public string strSQL =
"SELECT \"A_ID\", \"A_NAME\", \"A_TEL\", \"A_FAX\", \"A_MEMO\", \"A_UPTIME\", \"A_RGTIME\", \"A_F" +
"LAG\" FROM \"SPRINGJOE2\".\"SCV_HACCHU_K\" WHERE A_ID <> :A_ID";
}
}
列 'A_ID' は一意であるように制約されています。値 '1' は既に存在します。
では、テーブルに主キーを追加してみます。
ALTER TABLE "SPRINGJOE2"."SCV_HACCHU_K" ADD
PRIMARY KEY (A_ID);
ついでに
DataSet側も主キーに変更します。。
UniqueプロパティをTrueに変更すると
上記のようなエラーを発生させられます。
ALTER TABLE "SPRINGJOE2"."SCV_HACCHU_K" ADD
PRIMARY KEY (A_ID);
ついでに
DataSet側も主キーに変更します。。
UniqueプロパティをTrueに変更すると
上記のようなエラーを発生させられます。
文字列は有効な DateTime ではありませんでした。列 A_UPTIME にを格納できませんでした。 必要な型は DateTime です。
A_UPTIME列が日付の場合のエラー
dRow["A_UPTIME"] = "1";
日付に1を入れようとしているので発生
dRow["A_UPTIME"] = DateTime.Now;
dRow["A_UPTIME"] = "1";
日付に1を入れようとしているので発生
dRow["A_UPTIME"] = DateTime.Now;
2011年8月5日金曜日
[Visual Studio]からlocal(ローカル)IISにClickOnce
[Visual Studio]からlocal(ローカル)IISにClickOnce

コンポーネント
┗アプリケーションの追加削除
┗Windowsの機能の有効化または無効化
┗Windowsの機能画面
に移動します。
次に
InternertInformationService(IIS)をクリック
┗IISメタベース及びIIS構成 互換 ※
┗World Wide Webサービス
┗アプリケーションの追加 ※
┗セキュリティ
┗Windows 認証 ※
上記の3つのコンポーネントを有効にします。
「しばらくお待ちください。機能を構成しています。この処理には数分かかることがあります。」
というメッセージボックスの画面が表示されて、処理が終了するまでしばし待ちます。
(かなり時間がかかります)
[IISからWEB画面を確認]
コントロール パネル
┗管理ツール
┗インターネット インフォメーション サービス (IIS) マネージャ
WEBサイトの追加
機能ビューでディレクトリの参照で有効化
2011年6月11日土曜日
新卒既卒の就職に役立つ資格
就職活動に欠かせないものといえば資格です、
もしまだ何も就職活動をしていないという方がいらっしゃいましたら、
是非、基本情報処理技術者試験や応用情報技術者試験の取得から
始めてみてはいかがでしょうか?
まずは一歩目を踏み出すことが大切です。
より難易度の高い資格を目指してライバルに差をつけることも良いかもしれませんね。
もしまだ何も就職活動をしていないという方がいらっしゃいましたら、
是非、基本情報処理技術者試験や応用情報技術者試験の取得から
始めてみてはいかがでしょうか?
まずは一歩目を踏み出すことが大切です。
より難易度の高い資格を目指してライバルに差をつけることも良いかもしれませんね。
2011年6月4日土曜日
正解のInsert文
//発行する注文番号個数
int chuumonNoCnt = added.Rows.Count;
//シリアル番号取得 更新
int serialNo = 0 ;
//serialNo = GetChuumonNo(chuumonNoCnt);
//取得したsirialNoをカウントアップしていく(foreach内)
//serialNo += 1;
//[※]
sql = "insert into d_kounyuu (sagyouno , sagyoukubun , kounyuubangou , shiiresakichuumonbangou , shiiresakicode , atetantousyacode , kanjyoukamokucode , hinmeikikaku , suuryou , tanni , nounyuubasyo , karitanka , shiiretanka , chuumonbi , nouki , nounyuubi , kensyuunengappi , innsatujyoutai , torikeshiiraiinnsatujyoutai , tourokusya , tourokunichiji , koushinsya , koushinnichiji) values (:sagyouno ,:sagyoukubun ,:kounyuubangou ,:shiiresakichuumonbangou ,:shiiresakicode ,:atetantousyacode , :kanjyoukamokucode ,:hinmeikikaku ,:suuryou ,:tanni ,:nounyuubasyo ,:karitanka ,:shiiretanka ,:chuumonbi ,:nouki ,:nounyuubi ,:kensyuunengappi ,:innsatujyoutai , '0' ,:tourokusya ,statement_timestamp() ,:koushinsya ,statement_timestamp())";
cmd.CommandText = sql;
// パラメータ定義[※]
string[] pamName = new string[20] { "sagyouno", "sagyoukubun", "kounyuubangou", "shiiresakichuumonbangou", "shiiresakicode", "atetantousyacode", "kanjyoukamokucode", "hinmeikikaku", "suuryou", "tanni", "nounyuubasyo", "karitanka", "shiiretanka", "chuumonbi", "nouki", "nounyuubi", "kensyuunengappi", "innsatujyoutai ", "tourokusya", "koushinsya" };
2011年6月2日木曜日
新しい項目の作成テスト
//KeyDownで
//直前までにSelectNextControlをTrueに
***TextBox1.SelectNextControl = false;
【小数点フォーマット】
//①Utility.csのpublic enum Format : int
//の最終行に IraiSuuryou を追加
//②Utility.csのValidating⇒switch (format)
case Format.IraiSuuryou:
regex = new Regex(@"^[0-9]{1,10}.[0-9]{1,2}");
if (!regex.IsMatch(value))
{
message = String.Format(Const.Message002, controlCaption);
return false;
}
break;
//③Utility.csのGetGuidance内
case Format.IraiSuuryou:
guidanceFormat = "*****数量";
break;
//④後はいつものように
case Type.Syousuu:
format = Utility.Format.IraiSuuryou;
minLength = 1;
maxLength = 10;
imeMode = ImeMode.Off;
textAlign = HorizontalAlignment.Left;
mask = "0000000000.00";
break;
2011年6月1日水曜日
Shapeコピー 高さ変更など
//Shapeもコピーできる
range1.Copy(rangeAA);
//rangeAA.PasteSpecial(Excel.XlPasteType.xlPasteAll, Excel.XlPasteSpecialOperation.xlPasteSpecialOperationNone, false, false);
高さ変更
((Excel.Range)oSheet.Cells[rowstart + r1, colstart + c1]).Value2 = "なまえ";
((Excel.Range)oSheet.Cells[rowstart + r1, colstart + c1]).RowHeight = RowHeight[0];
range1.Copy(rangeAA);
高さ変更
((Excel.Range)oSheet.Cells[rowstart + r1, colstart + c1]).Value2 = "なまえ";
((Excel.Range)oSheet.Cells[rowstart + r1, colstart + c1]).RowHeight = RowHeight[0];
[1]
//テンプレートの高さ幅を保存
Excel.Range rangeA;
//テンプレート分用意する
double[] RowHeight = { 13, 13, 13, 13, 13, 13, 13, 13, 13, 13 };
for (int i = 0; i < RowHeight.Length; i++)
{
rangeA = (Excel.Range)oSheet.Cells[i+1, 1];
RowHeight[i] = GetExcelSize(rangeA.RowHeight, 0);
System.Runtime.InteropServices.Marshal.ReleaseComObject(rangeA);
}
//テンプレート列分用意
double[] ColWidth = { 13, 13, 13, 13, 13, 13, 13, 13, 13, 13 };
for (int i = 0; i < ColWidth.Length; i++)
{
rangeA = (Excel.Range)oSheet.Cells[1, i+2];
ColWidth[i] = GetExcelSize(rangeA.ColumnWidth, 0);
System.Runtime.InteropServices.Marshal.ReleaseComObject(rangeA);
}
[2]取得関数
private double GetExcelSize(object value, double defaultvalue)
{
double result = 0;
string strvalue = value.ToString();
if(Double.TryParse(strvalue,out result) == false)
{
result = defaultvalue;
}
return result;
}
[3]
//ペースト ※最初の列行は外す
if ((rowstart == 1 && colstart == 2) == false)
{
range1 = oSheet.get_Range(range1, range2);
range1.PasteSpecial(Excel.XlPasteType.xlPasteAll, Excel.XlPasteSpecialOperation.xlPasteSpecialOperationNone, false, false);
}
[4]もしくは1セルのみ選択
range1 = (Excel.Range)oSheet.Cells[rowstart, colstart];
range2 = (Excel.Range)oSheet.Cells[rowend, colend];range1 = (Excel.Range)oSheet.Cells[rowstart, colstart];
range2 = (Excel.Range)oSheet.Cells[rowstart, colstart];
//テンプレートの高さ幅を保存
Excel.Range rangeA;
//テンプレート分用意する
double[] RowHeight = { 13, 13, 13, 13, 13, 13, 13, 13, 13, 13 };
for (int i = 0; i < RowHeight.Length; i++)
{
rangeA = (Excel.Range)oSheet.Cells[i+1, 1];
RowHeight[i] = GetExcelSize(rangeA.RowHeight, 0);
System.Runtime.InteropServices.Marshal.ReleaseComObject(rangeA);
}
//テンプレート列分用意
double[] ColWidth = { 13, 13, 13, 13, 13, 13, 13, 13, 13, 13 };
for (int i = 0; i < ColWidth.Length; i++)
{
rangeA = (Excel.Range)oSheet.Cells[1, i+2];
ColWidth[i] = GetExcelSize(rangeA.ColumnWidth, 0);
System.Runtime.InteropServices.Marshal.ReleaseComObject(rangeA);
}
[2]取得関数
private double GetExcelSize(object value, double defaultvalue)
{
double result = 0;
string strvalue = value.ToString();
if(Double.TryParse(strvalue,out result) == false)
{
result = defaultvalue;
}
return result;
}
[3]
//ペースト ※最初の列行は外す
if ((rowstart == 1 && colstart == 2) == false)
{
range1 = oSheet.get_Range(range1, range2);
range1.PasteSpecial(Excel.XlPasteType.xlPasteAll, Excel.XlPasteSpecialOperation.xlPasteSpecialOperationNone, false, false);
}
[4]もしくは1セルのみ選択
range2 = (Excel.Range)oSheet.Cells[rowstart, colstart];
2011年5月31日火曜日
Excel操作(C#)
private void button1_Click(object sender, EventArgs e)
{
//1データごとの行数
int RowCount = 7;
int ColCount = 5;
int StartCol1 = 2;
int StartCol2 = ColCount + StartCol1;
int StartCol3 = ColCount + StartCol2;
Excel.Application oXls = new Excel.Application(); // Excelオブジェクト
string excelName = "C:\\Users\\x300\\sample.xls";
Excel.Workbook oWBook; // workbookオブジェクト
oXls.Visible = true;
// Excelファイルをオープンする
oWBook = (Excel.Workbook)(oXls.Workbooks.Open(
excelName, // オープンするExcelファイル名
Type.Missing, // (省略可能)UpdateLinks (0 / 1 / 2 / 3)
Type.Missing, // (省略可能)ReadOnly (True / False )
Type.Missing, // (省略可能)Format
// 1:タブ / 2:カンマ (,) / 3:スペース / 4:セミコロン (;)
// 5:なし / 6:引数 Delimiterで指定された文字
Type.Missing, // (省略可能)Password
Type.Missing, // (省略可能)WriteResPassword
Type.Missing, // (省略可能)IgnoreReadOnlyRecommended
Type.Missing, // (省略可能)Origin
Type.Missing, // (省略可能)Delimiter
Type.Missing, // (省略可能)Editable
Type.Missing, // (省略可能)Notify
Type.Missing, // (省略可能)Converter
Type.Missing, // (省略可能)AddToMru
Type.Missing, // (省略可能)Local
Type.Missing // (省略可能)CorruptLoad
));
// 与えられたワークシート名から、Worksheetオブジェクトを得る
string sheetName = "Sheet1";
Excel.Worksheet oSheet; // Worksheetオブジェクト
oSheet = (Excel.Worksheet)oWBook.Sheets[
getSheetIndex(sheetName, oWBook.Sheets)];
//データ取り出し(コピー)
for (int i = 0; i < 100; i++)
{
//何行目
int DataRowNum = (int)(i / 3);
//何列目
int DataColNum = (int)(i % 3);
Excel.Range range1;
Excel.Range range2;
//コピー元
range1 = (Excel.Range)oSheet.Cells[1, StartCol1];
range2 = (Excel.Range)oSheet.Cells[1 + RowCount - 1, StartCol1 + ColCount - 1];
range1 = oSheet.get_Range(range1, range2);
range1.Copy(Type.Missing);
int rowstart = 0;
int colstart = 0;
int rowend = 0;
int colend = 0;
//コピー先検索
switch (DataColNum)
{
case 0:
rowstart = DataRowNum * RowCount + 1;
colstart = StartCol1;
rowend = DataRowNum * RowCount + RowCount;
colend = StartCol1 + ColCount - 1;
break;
case 1:
rowstart = DataRowNum * RowCount + 1;
colstart = StartCol2;
rowend = DataRowNum * RowCount + RowCount;
colend = StartCol2 + ColCount - 1;
break;
case 2:
rowstart = DataRowNum * RowCount + 1;
colstart = StartCol3;
rowend = DataRowNum * RowCount + RowCount;
colend = StartCol3 + ColCount - 1;
break;
default:
break;
}
range1 = (Excel.Range)oSheet.Cells[rowstart, colstart];
range2 = (Excel.Range)oSheet.Cells[rowend, colend];
//ペースト
range1 = oSheet.get_Range(range1, range2);
range1.PasteSpecial(Excel.XlPasteType.xlPasteAll, Excel.XlPasteSpecialOperation.xlPasteSpecialOperationNone, false, false);
//値を入れていく
int c1 = 0;
int r1 = 0;
//名前
((Excel.Range)oSheet.Cells[rowstart + r1, colstart + c1]).Value2 = "なまえ";
//年齢
c1 = 3;
r1 = 1;
((Excel.Range)oSheet.Cells[rowstart + r1, colstart + c1]).Value2 = rowstart + r1;
}
//oWBook.Close(Type.Missing, Type.Missing, Type.Missing);
//oXls.Quit();
}
// 指定されたワークシート名のインデックスを返すメソッド
private int getSheetIndex(string sheetName, Excel.Sheets shs)
{
int i = 0;
foreach (Excel.Worksheet sh in shs)
{
if (sheetName == sh.Name)
{
return i + 1;
}
i += 1;
}
return 0;
}
{
//1データごとの行数
int RowCount = 7;
int ColCount = 5;
int StartCol1 = 2;
int StartCol2 = ColCount + StartCol1;
int StartCol3 = ColCount + StartCol2;
Excel.Application oXls = new Excel.Application(); // Excelオブジェクト
string excelName = "C:\\Users\\x300\\sample.xls";
Excel.Workbook oWBook; // workbookオブジェクト
oXls.Visible = true;
// Excelファイルをオープンする
oWBook = (Excel.Workbook)(oXls.Workbooks.Open(
excelName, // オープンするExcelファイル名
Type.Missing, // (省略可能)UpdateLinks (0 / 1 / 2 / 3)
Type.Missing, // (省略可能)ReadOnly (True / False )
Type.Missing, // (省略可能)Format
// 1:タブ / 2:カンマ (,) / 3:スペース / 4:セミコロン (;)
// 5:なし / 6:引数 Delimiterで指定された文字
Type.Missing, // (省略可能)Password
Type.Missing, // (省略可能)WriteResPassword
Type.Missing, // (省略可能)IgnoreReadOnlyRecommended
Type.Missing, // (省略可能)Origin
Type.Missing, // (省略可能)Delimiter
Type.Missing, // (省略可能)Editable
Type.Missing, // (省略可能)Notify
Type.Missing, // (省略可能)Converter
Type.Missing, // (省略可能)AddToMru
Type.Missing, // (省略可能)Local
Type.Missing // (省略可能)CorruptLoad
));
// 与えられたワークシート名から、Worksheetオブジェクトを得る
string sheetName = "Sheet1";
Excel.Worksheet oSheet; // Worksheetオブジェクト
oSheet = (Excel.Worksheet)oWBook.Sheets[
getSheetIndex(sheetName, oWBook.Sheets)];
//データ取り出し(コピー)
for (int i = 0; i < 100; i++)
{
//何行目
int DataRowNum = (int)(i / 3);
//何列目
int DataColNum = (int)(i % 3);
Excel.Range range1;
Excel.Range range2;
//コピー元
range1 = (Excel.Range)oSheet.Cells[1, StartCol1];
range2 = (Excel.Range)oSheet.Cells[1 + RowCount - 1, StartCol1 + ColCount - 1];
range1 = oSheet.get_Range(range1, range2);
range1.Copy(Type.Missing);
int rowstart = 0;
int colstart = 0;
int rowend = 0;
int colend = 0;
//コピー先検索
switch (DataColNum)
{
case 0:
rowstart = DataRowNum * RowCount + 1;
colstart = StartCol1;
rowend = DataRowNum * RowCount + RowCount;
colend = StartCol1 + ColCount - 1;
break;
case 1:
rowstart = DataRowNum * RowCount + 1;
colstart = StartCol2;
rowend = DataRowNum * RowCount + RowCount;
colend = StartCol2 + ColCount - 1;
break;
case 2:
rowstart = DataRowNum * RowCount + 1;
colstart = StartCol3;
rowend = DataRowNum * RowCount + RowCount;
colend = StartCol3 + ColCount - 1;
break;
default:
break;
}
range1 = (Excel.Range)oSheet.Cells[rowstart, colstart];
range2 = (Excel.Range)oSheet.Cells[rowend, colend];
//ペースト
range1 = oSheet.get_Range(range1, range2);
range1.PasteSpecial(Excel.XlPasteType.xlPasteAll, Excel.XlPasteSpecialOperation.xlPasteSpecialOperationNone, false, false);
//値を入れていく
int c1 = 0;
int r1 = 0;
//名前
((Excel.Range)oSheet.Cells[rowstart + r1, colstart + c1]).Value2 = "なまえ";
//年齢
c1 = 3;
r1 = 1;
((Excel.Range)oSheet.Cells[rowstart + r1, colstart + c1]).Value2 = rowstart + r1;
}
//oWBook.Close(Type.Missing, Type.Missing, Type.Missing);
//oXls.Quit();
}
// 指定されたワークシート名のインデックスを返すメソッド
private int getSheetIndex(string sheetName, Excel.Sheets shs)
{
int i = 0;
foreach (Excel.Worksheet sh in shs)
{
if (sheetName == sh.Name)
{
return i + 1;
}
i += 1;
}
return 0;
}
2011年5月22日日曜日
How To Use SmartTagPanel In Component Designer when you use VS.NET
Imports System.ComponentModel
_
Public Class XTextBox
Inherits TextBox
'... customizations
End Class
Public Class mySmartTagActionList
Inherits SmartTagActionListBase
Private m_Control As XTextBox
Sub New(ByVal component As IComponent)
MyBase.New(component)
m_Control = CType(component, XTextBox)
End Sub
Public Property BackColor() As Color
Get
Return m_Control.BackColor
End Get
Set(ByVal value As Color)
Me.SetPropertyByName(m_Control, "BackColor", value)
End Set
End Property
Public Property ForeColor() As Color
Get
Return m_Control.ForeColor
End Get
Set(ByVal value As Color)
Me.SetPropertyByName(m_Control, "ForeColor", value)
End Set
End Property
Public Property IsMultiline() As Boolean
Get
Return m_Control.Multiline
End Get
Set(ByVal value As Boolean)
Me.SetPropertyByName(m_Control, "Multiline", value)
End Set
End Property
Public Sub SwapColors()
Dim c As Color = Me.ForeColor
Me.ForeColor = Me.BackColor
Me.BackColor = c
RefreshDesigner()
End Sub
Public Overrides Sub AddActionItems()
'These properties are already defined
'in base (SmartTagActionListBase) class:
' => Name, Text, Font, RightToLeft
'Other properties/Methods should be defined in current class
AddActionHeader("Main")
AddActionProperty("Name", "Name:", "Main", "")
AddActionProperty("Text", "Text:", "Main", "")
AddActionProperty("Font", "Font:", "Main", "")
AddActionProperty("IsMultiline", "Multiline:", "", "")
AddActionHeader("Colors")
AddActionProperty("ForeColor", "ForeColor:", _
"Colors", "Sets the ForeColor")
AddActionProperty("BackColor", "BackColor:", _
"Colors", "Sets the BackColor")
AddActionText("This is my info...", "Colors")
AddActionMethod("SwapColors", "Swap Colors", _
"Colors", "Swap ForeColor/BackColor", True)
End Sub
End Class
2011年4月12日火曜日
DataGridViewのソート(sort)連動させる方法
'----------------------------------------------------------------------------------------------
'ソートが完了したとき
'グリッド2もソートする
'----------------------------------------------------------------------------------------------
Private Sub DataGridView1_Sorted(ByVal sender As System.Object, ByVal e As System.EventArgs) Handles DataGridView1.Sorted
'------------------------------------------------------------------------------------------
'機能:データグリッド連動ソート
'メモ:DataGridView1のソート順が変更されたら、
' DataGridView2のソート順も連動して変更させる処理
'------------------------------------------------------------------------------------------
'ソートが実施されたカラム
Dim srtdCol As DataGridViewColumn = Me.DataGridView1.SortedColumn
'オーダー順序はヘッダーから取得(SortGlyphDirection)
Dim srtdOrder As SortOrder = Me.DataGridView1.Columns(srtdCol.Index).HeaderCell.SortGlyphDirection
'並び替えが実施されると昇順、降順のどちらかでNoneは指定されなくなる
If srtdOrder = SortOrder.Ascending Then
'Ascending
Me.DataGridView2.Sort(Me.DataGridView2.Columns(srtdCol.Index), System.ComponentModel.ListSortDirection.Ascending)
ElseIf srtdOrder = SortOrder.Descending Then
'Descending
Me.DataGridView2.Sort(Me.DataGridView2.Columns(srtdCol.Index), System.ComponentModel.ListSortDirection.Descending)
End If
End Sub
2011年4月11日月曜日

2011年4月7日木曜日
DataGridViewが2つあり片方がソートされたらもう一方もソートするには?
'----------------------------------------------------------------------------------------------
'ソートが完了したとき
'グリッド2もソートする
'----------------------------------------------------------------------------------------------
Private Sub DataGridView1_Sorted(ByVal sender As System.Object, ByVal e As System.EventArgs) Handles DataGridView1.Sorted
'------------------------------------------------------------------------------------------
'機能:データグリッド連動ソート
'メモ:DataGridView1のソート順が変更されたら、
' DataGridView2のソート順も連動して変更させる処理
'------------------------------------------------------------------------------------------
'ソートが実施されたカラム
Dim srtdCol As DataGridViewColumn = Me.DataGridView1.SortedColumn
'オーダー順序はヘッダーから取得(SortGlyphDirection)
Dim srtdOrder As SortOrder = Me.DataGridView1.Columns(srtdCol.Index).HeaderCell.SortGlyphDirection
'並び替えが実施されると昇順、降順のどちらかでNoneは指定されなくなる
If srtdOrder = SortOrder.Ascending Then
'Ascending
Me.DataGridView2.Sort(Me.DataGridView2.Columns(srtdCol.Index), System.ComponentModel.ListSortDirection.Ascending)
ElseIf srtdOrder = SortOrder.Descending Then
'Descending
Me.DataGridView2.Sort(Me.DataGridView2.Columns(srtdCol.Index), System.ComponentModel.ListSortDirection.Descending)
End If
End Sub
DataGridViewで2つのグリッドを連動させてスクロールするには?
'----------------------------------------------------------------------------------------------
'スクロール時に2つのグリッドを連動して動かす
'----------------------------------------------------------------------------------------------
Private Sub DataGridView1_Scroll(ByVal sender As System.Object, ByVal e As System.Windows.Forms.ScrollEventArgs) Handles DataGridView1.Scroll
'カラム ※あまり効果ない
Me.DataGridView2.FirstDisplayedScrollingColumnIndex = Me.DataGridView1.FirstDisplayedScrollingColumnIndex
'カラム
Me.DataGridView2.HorizontalScrollingOffset = Me.DataGridView1.HorizontalScrollingOffset
'行
Me.DataGridView2.FirstDisplayedScrollingRowIndex = Me.DataGridView1.FirstDisplayedScrollingRowIndex
End Sub
2011年2月20日日曜日
HashTableカンマキー
Dim ht As New Hashtable
ht.Add("", "1")
ht.Add("BBB,222", "2")
ht.Add("CCC,333", "3")
ht.Add("DDD,444", "4")
'キーが含まれているか確認
If ht.ContainsKey("DDD,444") Then
'数値インクリメント
'値の数値判定
If IsNumeric(ht("DDD,444")) Then
Dim index As Integer = CInt(ht("DDD,444")) + 1
ht("DDD,444") = index
End If
Else
'含まれていなければ追加
ht.Add("DDD,444", "1")
End If
'キーの数だけループ
Dim strKeysVal() As String
For Each strKey As String In ht.Keys
'コンマで分割
strKeysVal = strKey.Split(",")
'キーの配列長さ判定
If strKeysVal.Length > 1 Then
'値の数値判定
If IsNumeric(ht(strKey)) Then
Dim index As Integer = CInt(ht(strKey))
End If
End If
Next
2011年2月5日土曜日
Word.Applicationが使用できない 使用方法
Office PIAs の 参照の場所が間違っていると考えられます。
例)
C:\Program Files\Microsoft Visual Studio 9.0\Visual Studio Tools for Office\PIA\Office12\Office.dll
例)
C:\Program Files\Microsoft Visual Studio 9.0\Visual Studio Tools for Office\PIA\Office12\Office.dll
2011年1月29日土曜日
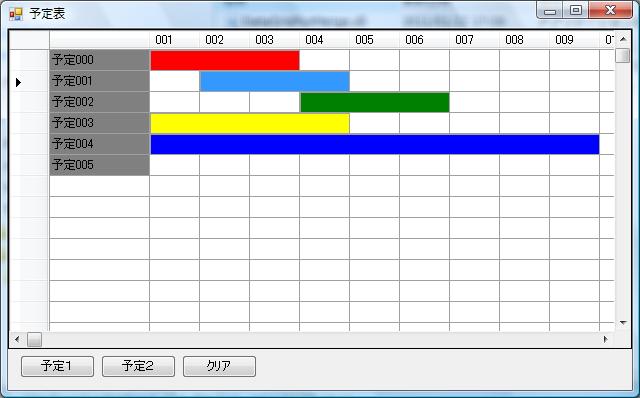
データグリッドでセル結合を実現
データグリッドでセルが結合できないのは意外と不便に感じるものです、
そんな時にはDataGridViewForMergeコンポーネントを是非ご活用されてみてはいかがでしょうか。
セル結合コンポDataGridViewForMergeダウンロードできます。
Grid(グリッド)でセルを結合したい時などに便利なコンポーネントです。
DataGridやDataGridViewで実現可能

複数セルの結合も可能です。

利用してみたいという方は、
Vector(ベクター)からダウンロードできます。
【サンプルソースはこちら】
'初期化
Me.DataGridViewForMerge1.MergeCellDataList.Clear()
'==================================
'詳細設定サンプル
'==================================
'----------------------------------
'Rowヘッダー作成
'----------------------------------
For rowIndex As Integer = 0 To 5
Me.DataGridViewForMerge1.Rows(rowIndex).Cells(0).Value = "予定" & rowIndex.ToString("000")
Me.DataGridViewForMerge1.Rows(rowIndex).Cells(0).Style.BackColor = Color.Gray
Next
'-----------------------------------
'Colヘッダー作成
'-----------------------------------
For colIndex As Integer = 1 To 31
Me.DataGridViewForMerge1.Columns(colIndex).HeaderText = colIndex.ToString("000")
Me.DataGridViewForMerge1.Columns(colIndex).Width = 50
Next
'-----------------------------------
'結合処理
'-----------------------------------
'結合クラス作成
Dim mergeCellClass As MergeCellData
mergeCellClass = New MergeCellData
'開始行
mergeCellClass.StartRow = 0
'開始列
mergeCellClass.StartCol = 1
'終了行
mergeCellClass.EndRow = 0
'終了列
mergeCellClass.EndCol = 3
'色指定
mergeCellClass.BackColor = Color.Red
'登録
Me.DataGridViewForMerge1.MergeCellDataList.Add(mergeCellClass)
'------------------------------------
mergeCellClass = New MergeCellData
'開始行
mergeCellClass.StartRow = 1
'開始列
mergeCellClass.StartCol = 2
'終了行
mergeCellClass.EndRow = 1
'終了列
mergeCellClass.EndCol = 4
'色指定
mergeCellClass.BackColor = Color.Blue
'登録
Me.DataGridViewForMerge1.MergeCellDataList.Add(mergeCellClass)
'------------------------------------
mergeCellClass = New MergeCellData
'開始行
mergeCellClass.StartRow = 2
'開始列
mergeCellClass.StartCol = 4
'終了行
mergeCellClass.EndRow = 2
'終了列
mergeCellClass.EndCol = 6
'色指定
mergeCellClass.BackColor = Color.Green
'登録
Me.DataGridViewForMerge1.MergeCellDataList.Add(mergeCellClass)
'------------------------------------
mergeCellClass = New MergeCellData
'開始行
mergeCellClass.StartRow = 3
'開始列
mergeCellClass.StartCol = 1
'終了行
mergeCellClass.EndRow = 3
'終了列
mergeCellClass.EndCol = 4
'色指定
mergeCellClass.BackColor = Color.Yellow
'登録
Me.DataGridViewForMerge1.MergeCellDataList.Add(mergeCellClass)
'------------------------------------
mergeCellClass = New MergeCellData
'開始行
mergeCellClass.StartRow = 4
'開始列
mergeCellClass.StartCol = 1
'終了行
mergeCellClass.EndRow = 4
'終了列
mergeCellClass.EndCol = 9
'色指定
mergeCellClass.BackColor = Color.Blue
'登録
Me.DataGridViewForMerge1.MergeCellDataList.Add(mergeCellClass)
'描画する
Me.DataGridViewForMerge1.Refresh()
そんな時にはDataGridViewForMergeコンポーネントを是非ご活用されてみてはいかがでしょうか。
セル結合コンポDataGridViewForMergeダウンロードできます。
Grid(グリッド)でセルを結合したい時などに便利なコンポーネントです。
DataGridやDataGridViewで実現可能
複数セルの結合も可能です。
利用してみたいという方は、
Vector(ベクター)からダウンロードできます。
【サンプルソースはこちら】
'初期化
Me.DataGridViewForMerge1.MergeCellDataList.Clear()
'==================================
'詳細設定サンプル
'==================================
'----------------------------------
'Rowヘッダー作成
'----------------------------------
For rowIndex As Integer = 0 To 5
Me.DataGridViewForMerge1.Rows(rowIndex).Cells(0).Value = "予定" & rowIndex.ToString("000")
Me.DataGridViewForMerge1.Rows(rowIndex).Cells(0).Style.BackColor = Color.Gray
Next
'-----------------------------------
'Colヘッダー作成
'-----------------------------------
For colIndex As Integer = 1 To 31
Me.DataGridViewForMerge1.Columns(colIndex).HeaderText = colIndex.ToString("000")
Me.DataGridViewForMerge1.Columns(colIndex).Width = 50
Next
'-----------------------------------
'結合処理
'-----------------------------------
'結合クラス作成
Dim mergeCellClass As MergeCellData
mergeCellClass = New MergeCellData
'開始行
mergeCellClass.StartRow = 0
'開始列
mergeCellClass.StartCol = 1
'終了行
mergeCellClass.EndRow = 0
'終了列
mergeCellClass.EndCol = 3
'色指定
mergeCellClass.BackColor = Color.Red
'登録
Me.DataGridViewForMerge1.MergeCellDataList.Add(mergeCellClass)
'------------------------------------
mergeCellClass = New MergeCellData
'開始行
mergeCellClass.StartRow = 1
'開始列
mergeCellClass.StartCol = 2
'終了行
mergeCellClass.EndRow = 1
'終了列
mergeCellClass.EndCol = 4
'色指定
mergeCellClass.BackColor = Color.Blue
'登録
Me.DataGridViewForMerge1.MergeCellDataList.Add(mergeCellClass)
'------------------------------------
mergeCellClass = New MergeCellData
'開始行
mergeCellClass.StartRow = 2
'開始列
mergeCellClass.StartCol = 4
'終了行
mergeCellClass.EndRow = 2
'終了列
mergeCellClass.EndCol = 6
'色指定
mergeCellClass.BackColor = Color.Green
'登録
Me.DataGridViewForMerge1.MergeCellDataList.Add(mergeCellClass)
'------------------------------------
mergeCellClass = New MergeCellData
'開始行
mergeCellClass.StartRow = 3
'開始列
mergeCellClass.StartCol = 1
'終了行
mergeCellClass.EndRow = 3
'終了列
mergeCellClass.EndCol = 4
'色指定
mergeCellClass.BackColor = Color.Yellow
'登録
Me.DataGridViewForMerge1.MergeCellDataList.Add(mergeCellClass)
'------------------------------------
mergeCellClass = New MergeCellData
'開始行
mergeCellClass.StartRow = 4
'開始列
mergeCellClass.StartCol = 1
'終了行
mergeCellClass.EndRow = 4
'終了列
mergeCellClass.EndCol = 9
'色指定
mergeCellClass.BackColor = Color.Blue
'登録
Me.DataGridViewForMerge1.MergeCellDataList.Add(mergeCellClass)
'描画する
Me.DataGridViewForMerge1.Refresh()
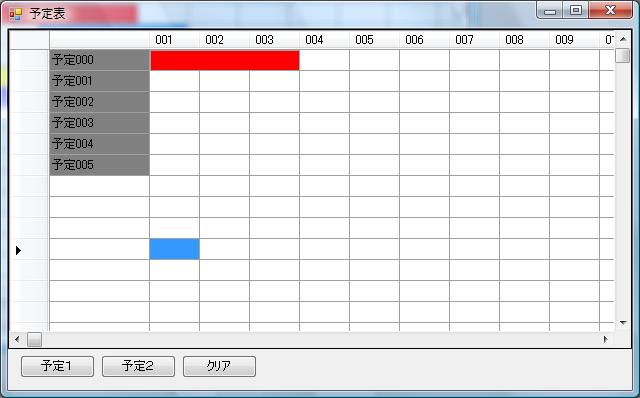
2011年1月27日木曜日
DataGridでセルを結合できるコンポーネントVB
MSFlexGridのようにセルを結合できるコンポーネントの紹介
ダウンロードはこちらで公開されています⇒Vector(ベクター)
1、結合はこんな感じになります。
2、複数のセル結合は表を作るのに最適
ダウンロードはこちらで公開されています⇒Vector(ベクター)
ダウンロードはこちらで公開されています⇒Vector(ベクター)
1、結合はこんな感じになります。
2、複数のセル結合は表を作るのに最適
ダウンロードはこちらで公開されています⇒Vector(ベクター)
2011年1月26日水曜日
DataGridでセル(Cell)を結合(Merge)する方法
Grid(グリッド)でセルを結合したい時などに便利なコンポーネントです。
Vector(ベクター)からダウンロードできます。 DataGridやDataGridViewで実現可能
複数セルの結合も可能です。
利用してみたいという方は、 Vector(ベクター)からダウンロードできます。
登録:
コメント (Atom)